6 minute read
In geospatial, your next customer isn’t always searching for a new tool.
But they are hiring GIS leads, posting about climate resilience, watching mapping platform demos, connecting with your competitors…
Those are signals that show early-stage buying intent.
And LinkedIn is where they happen.
But unless you know exactly what you are looking for (and how), those faint signals are drowned out by ALL. THE. NOISE.
That’s where Sales Navigator comes in.
Not for lead scraping or cold pitching (c’mon, it’s not 2017 anymore), but as your real-time market intelligence platform that helps you recognise, categorise, and act on the real-time intent signals your leads are sending.
Let’s break down how that works for geospatial teams.
Step 1: Define and prioritise your market from the ground up
Before you search for leads or accounts on Sales Navigator, you need to know who you’re searching for.
That’s where Account-Driven GTM starts—by building a clear, structured map of your market.
- Define your Total Addressable Market (TAM): Use firmographic filters in Sales Navigator to map sectors like utilities, government, transport, or environment.
- Layer in relevance: Add filters for company size, region, and even tech stack (like companies using Esri, QGIS, or AWS).
- Watch for growth signals: Hiring trends, job postings, funding events—these often signal readiness for new tech or partnerships.

Example of firmographic filters to find potential accounts in your TAM
From here, you segment accounts into tiers:
- Tier 1: High-fit, high-intent. These get personalised outreach.
- Tier 2: Moderate fit or intent. Targeted nurture.
- Tier 3: Lower priority. Light-touch or ad-based engagement.

Example of saving accounts to various lists based on Tiers
Sales Navigator helps you structure this by saving account lists, assigning tags, and keeping your targeting organised.
Step 2: Find the people behind the account
Buying committees in geospatial are rarely just one person. You’ll need to surface everyone from GIS managers and innovation leads to CTOs and sustainability officers.
The place where most people go wrong?
Trying to manually extract relevant leads from company lists.
In other words, going into saved accounts, navigating to the employees section, and searching for relevant decision makers using keywords.
Although this is a viable way of finding leads, it’s slow and arduous. Not to mention unnecessary in 2025 where we have a bunch of great tools to make our lives easier.
The best tool (I have found) to extract relevant leads from your account lists is Phantom Buster. Here, getting to your leads is a 2-step process:
1️⃣ Use the “Sales Navigator Search Export” phantom to export your account list to a CSV file.
2️⃣ Next, upload that CSV into the “LinkedIn Company Employees Export” phantom and specify the list of job titles you’d like to extract.
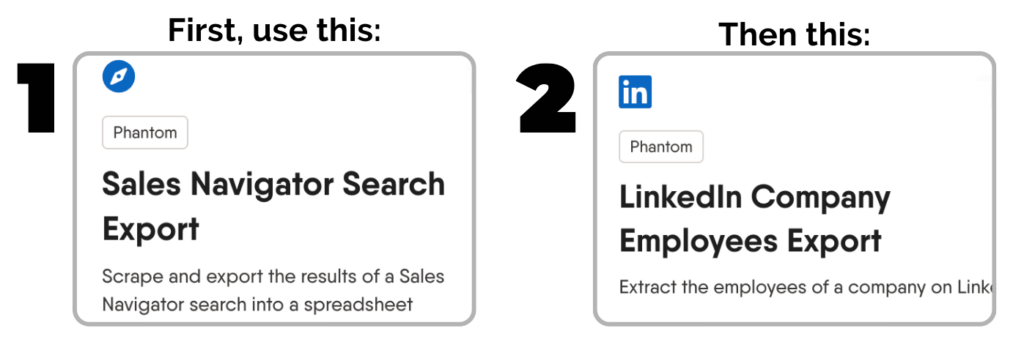
This will result in a new CSV file with your relevant leads extracted from relevant accounts for you to pull into your CRM and build campaigns for.
Or create lead lists using lead filters
Alternatively, you can create lead lists using Sales Navigator’s lead filters.
What’s the difference, I hear you ask.
Good question. When you go via the route outlined above, you will have leads clearly connected to target accounts. This allows you to do lead mapping, i.e. building a real picture of who’s involved in the decision process across priority accounts.
When you go straight via lead filters, you’ll get leads from any/all accounts that match your parameters, but it’s harder to map decision making chains.
That said, if you are targeting smaller companies or singular decision makers, this can be a more straightforward approach.
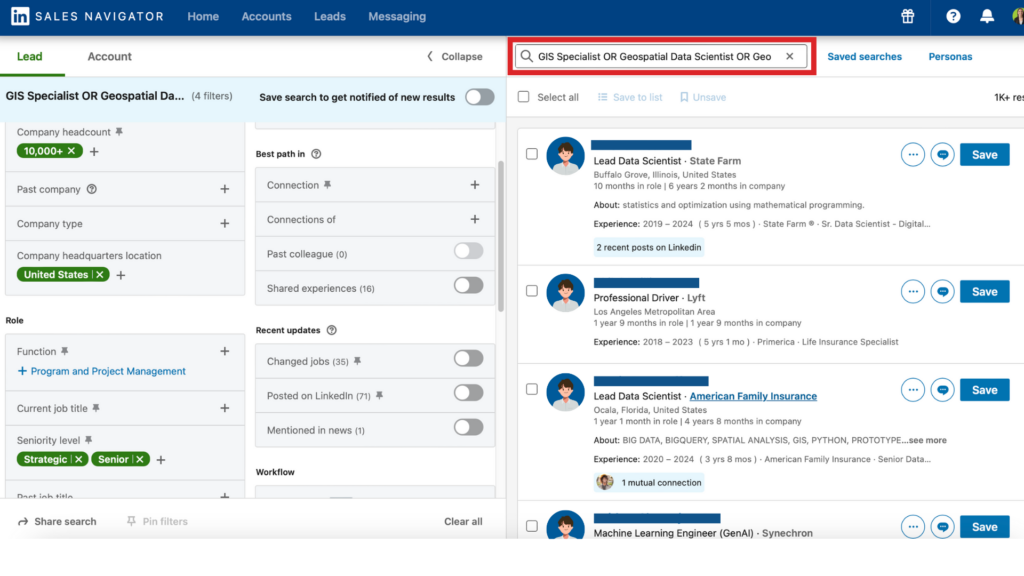
With Sales Navigator’s lead filters, you can:
- Search by function (GIS, Engineering, Data Science, Ops)
- Filter by seniority (Manager, Director, VP, CXO)
- Combine with keywords (“geospatial data,” “climate analytics,” etc.)
You can then save those leads into tiered lists (e.g., “Utility GIS Leads – Tier 1”). Tag their role (Evaluator, Budget Holder, Champion). Then you’re ready for outreach.
Step 3: Spot and track intent signals
Not all activity is meaningful. But some of it is gold. Sales Navigator lets you track:
- Job changes: Your former champion is now leading a new team? That’s a door opener.
- Engagement with content: Viewing geospatial case studies or climate resilience posts? That’s context.
- Shared connections: Are they linked to your customers or competitors? That’s insight.
- Posting activity: Recent thought leadership often signals openness to new ideas.
These are real-time intent signals. And when layered on top of your account tiers, they tell you exactly when to engage.
Step 4: Build personalised campaigns
Once you have your account tiers and lead lists in place, you can:
Export those lists using PhantomBuster:
- Pull account-level and contact-level data into a Google Sheet or CRM
- Use for outreach campaigns, ad targeting, or sales enablement
Build smart LinkedIn sequences with tools like Dripify:
- Start with a connection request
- Follow with a message offering relevant insight or resource (no pitch)
- Drop in a case study, industry benchmark, or helpful lead magnet
- Ask a light qualifying question (“Are you exploring X this quarter?”)
Run warm surround-sound campaigns:
- Upload lists from Sales Nav into LinkedIn Ads Manager
- Show helpful, relevant content while your sales outreach is in flight
This is how you create more relevant, personalised outreach.
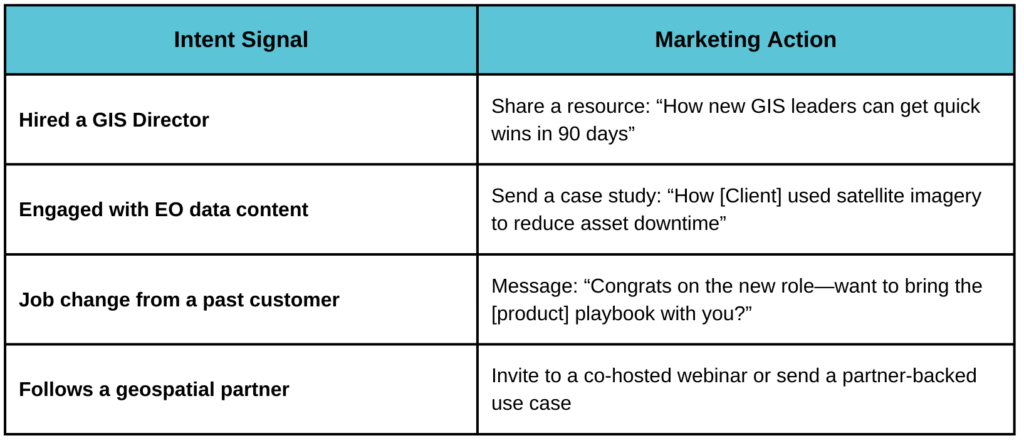
For example, here are some sales/marketing actions that could be triggered by various lead signals:
What this looks like in practice
Imagine your marketing team is publishing a piece on “Climate Resilience in Transportation.” You:
- Pull a list of Directors of Infrastructure at U.S. transport agencies using Sales Nav
- Layer in a signal filter: “Posted on LinkedIn in past 30 days”
- Build a Tier 1 list and launch a Dripify campaign
- Upload the list to LinkedIn Ads and run paid content alongside
- Track profile views, replies, demo requests
That’s account-driven GTM, executed on LinkedIn.
The bottom line
If you’re a geospatial brand still relying on static lists and mass DMs, LinkedIn will feel noisy and slow.
But if you build the right foundation—ICP clarity, tiering, signal tracking—Sales Navigator becomes a powerful tool for actually reaching warm leads with a high intent to buy.
And when you pair it with campaign workflows, intent signals, and cross-channel messaging, it becomes your most reliable source of pipeline.
This is how to get the most out of LinkedIn in 2025.
Need help? Let’s talk.